My Docker Development Workflow: Code, Build, Push, Run
You’ve installed the tools. 🔨🔧 You’ve done the basic Docker tutorials. And you’ve acquired some neat badges to put in your email signature.
Now, you’re itching to start creating containers for Docker, Podman, or your favourite container engine.
But you’re probably wondering:
How do you build and deploy containers to a production server? What’s the process?
Do you just stick the pieces together, and hope for the best?
How do people do this, in the real world?
In this article, I’ll show you the main steps involved in developing containers. You will see a 10,000-foot view of what it looks like to work with containers, day-to-day.
Featuring a typical developer. (Oh, that’s me!)
This might be new to you! As developers, we’ve not always traditionally been responsible for how our code runs.
But developing for containers gives you a lot more power as a developer, and I’d say more freedom too.
Along the way, I’ll give you some useful links, for you to do your own research, so that you can explore this brave new world.
Buid and deploy: the four stages
Generally, when I’m creating software that will be deployed in containers, my changes go through these four stages:
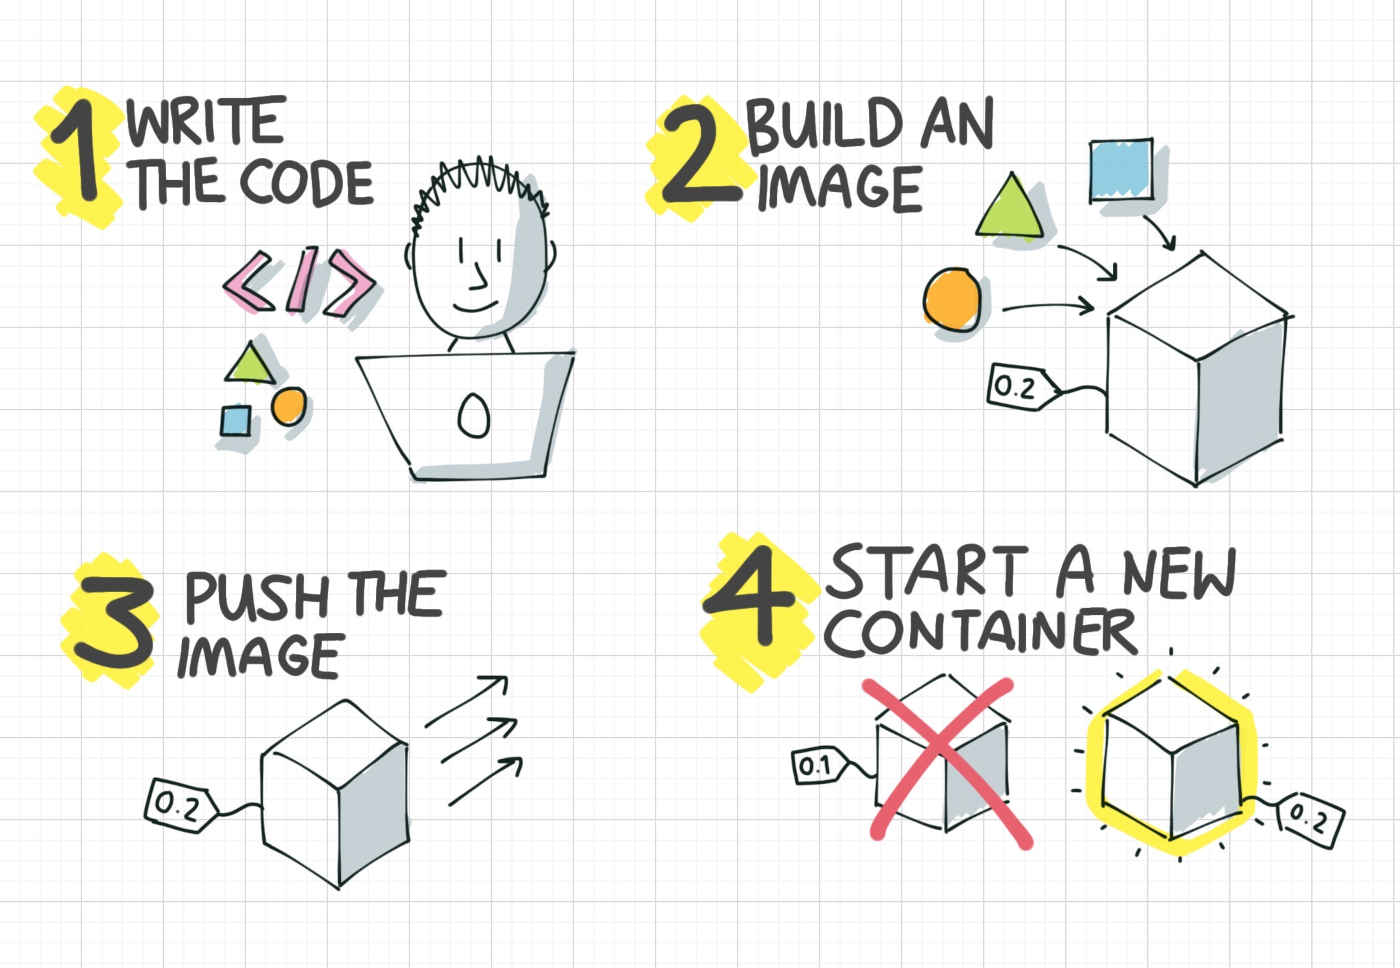
The four stages of my Docker development workflow
-
Write the code
-
Build a container image
-
Push the image to the server, either directly or via a registry
-
Start the application, with the new image
This is a very high-level view of the stages involved. At a lower level, you might use a bunch of different tools or methods. But broadly, the overall process is the same.
I’m going to dive into each of these in detail, and explain what they mean. First, let’s have a look at coding.
1. Write the code (and test it)
The first part is writing the code for your application. This is the part where you’re doing lots of rapid development, as you write a new feature.
You can develop your code as usual, on your laptop, not inside a container.
And this is absolutely fine. It’s not essential to develop for Docker, inside Docker.
But, some people find that Docker is beneficial during development, for creating a clean development environment to work in.
How? You use a Docker container as your development environment. This is especially useful if you need special software installed in your development environment.
How do you develop inside a Docker container?
Developing inside a Docker container generally means starting a container and leaving it running, while you edit your source code. As you make changes, you see the changes appear in the container.
To get your source code inside a container, you can use something called a bind mount. This is a Docker feature that lets you make files from your local machine available inside the container, and any changes are reflected, in real time.
Bind mounts can be really helpful for source code.
For example: I can start a new container from the Python image, mount my source code inside it, and run my Python program, all without needing Python installed on my host operating system.
This allows me to edit my Python files on my local computer, and have them immediately available inside the container.
You don’t need to do this though. It’s not mandatory to develop inside a container. But some people find that it helps them. For example, if a specific version of Python is required, you can just pull that version from Docker Hub.
Once you’ve finished writing your feature (and tested it!), you can go on to building a container image, which we’ll do next.
2. Build a container image
At this point, you’re ready to create a container image for your app.
This step creates your build artifact. This artifact, the container image, or Docker image, is the thing that you deploy to a server. It contains your application code, libraries and everything it needs to run.
There are lots of tools to help you
Previously, creating a container image required installing docker and writing a Dockerfile.
But now, there are tools you can use to make this process simpler. You can build container images with Buildpacks, Source-to-Image, Jib, and other tools.
Personally, as a Java developer, I think Jib is really great. It produces small, well-built images and is quite easy to use.
My point here is, you don’t have to write a Dockerfile if you don’t want to.
As long as your build step is easily repeatable by someone else, you’re good. That build step can be executed by Docker, Buildpacks, or any other tool.
So, the output from this step is a deployable container image. That means you build a tested, self-contained package, ready to be deployed.
How do you get the image to the server? Let’s look at that next.
3. Push the image to the server
I’ve seen this next step cause a bit of confusion for Docker newbies.
Now you’ve built a container, how do you get it to the target server? Can you just copy it?
When you use Docker to build an image, it doesn’t produce a file which you can see or copy directly.
Instead, it stores the image as several layers, which you can visualise when you type docker images.
The most common way to move an image from your library, is to docker push it to an intermediary server, called a registry.
Use a container image registry to share images
You’ve probably already used a well-known registry when you were learning Docker, without realising it. It’s called Docker Hub, and it’s where a lot of official images are located.
You can push your image to Docker Hub if you have a free Docker account.
If you’re just hacking away, learning Docker, you can use the free public Docker image hosting at Docker Hub.
But if you’re writing private code, then you’ll probably need to host your image privately. You can do this on Docker Hub.
Or, there are lots of other options:
-
SaaS registries like GitHub Packages and Quay.io
-
Registries from public cloud providers: Amazon’s Elastic Container Registry (ECR), Google Cloud’s Container Registry
-
Self-hosted registry like Nexus, Artifactory or Harbor
Most companies which use Docker, use one of these registries, or run their own registry.
Can I just copy the image file?
If you don’t want to push your image to a registry, you can save the container image as a file, then copy it to the server and load it.
Docker has the docker image save command, which will save an image from your personal library as a .tar file.
You can then upload this image up to your production server (e.g. using scp), and run docker image load.
This is fine for learning and simple setups. But when you need to manage many images and tags, or you want to run the same image on multiple servers, you’ll find it easier to use a registry.
Finally, let’s look at how to pick up the changes.
4. Restart the application, with the new image
Once the Docker image is on the server, the final step in the workflow is to start the application.
You might choose to start your containers automatically, with Podman and Systemd.
Or, if you’ve got a docker-compose file for your application, then you run docker-compose up.
If the app is already running, and you’re updating to a new version, then it’s a bit different. You shouldn’t go poking around inside a container that’s running, to upgrade your app.
Instead, you simply throw away the old container (like an empty Amazon box!) and start a new one.
A docker pull, with a docker stop and a docker run will do the the trick here. These steps get the latest image from the registry, throw away the old container, and start a new one.
There is a small amount of downtime while you do this, while you to stop the running container, and start the new one. So if you can’t bear the downtime, then look into rolling updates.
But… I gotta have my containers running 24x7!
Once you need your containers to be up and running 24/7 with no downtime, you might need…… Docker Swarm or Kubernetes to the rescue! These tools are designed for orchestrating containers like this, and handling rolling updates.
But these tools do come with some added complexity though. Many teams happily run containers without either Swarm or Kubernetes.
Variations in the real world
So back to the original question - how does this work in the real world?
Most teams follow some variation on this same high-level approach: code, build, push, run!
But the exact details can vary. Take these examples:
-
You might use a CI/CD tool like GitLab or Jenkins to run this whole process automatically, instead of doing these steps manually.
-
You might build the container image in the cloud, or perhaps inside a Kubernetes cluster, instead of on your local workstation.
-
You might add extra steps, which test the container image, or scan it for security issues.
-
You might use a container orchestrator like Swarm or Kubernetes to run the container for you.
The possibilities for variation really are endless. But since you can’t possibly learn every tool and method, just have a go and find a workflow that suits you and your team.
Next steps & Recommended Training
Thanks for reading my introduction to a typical development workflow with Docker. We saw how Docker changes the process of building and deploying apps.
To learn more, check the Docker Mastery course by Bret Fisher on Udemy, which explores all of these subjects in more detail. It’s easy to follow, and will help you own your own Docker workflow.
Happy containerising!