How Do You Deploy and Manage Apps in Kubernetes?
You’ve grasped Kubernetes primitives, and now you’re starting to build up a picture of how you want your application to look on K8s. But your job doesn’t end there. You’re wondering how to deploy and manage your applications. It’s a minefield. 💣 So what are your options for deployment management on Kubernetes?
The options for deploying applications to Kubernetes are a bit fragmented, and aren’t immediately obvious when you do a quick google. So let’s take a tour of some of the options available to make your application available on K8s.
If you’re a developer or an architect looking to find out how to actually get your app deployed onto Kubernetes, this one’s for you.
Write YAML and apply it by hand 💤
Do you love typing? Do you really, really love typing?

Writing them YAMLs
Source: Rawpixel.com / CC BY 4.0
The simplest way to deploy an application to Kubernetes is to write your manifests in YAML or JSON, and then apply them with the kubectl apply command.
kubectl apply
Here’s what a typical usage of kubectl looks like:
kubectl apply -f my-pod.yml
This is how we all first start creating objects in Kubernetes, such as Pods, Deployments and whatnot.
kubectl apply is basic, convenient, and you can use it to deploy a JSON/YAML file on your laptop, a file from GitHub, or anywhere on the web.
Heavy on the manual work
But you need to write all that YAML yourself first. And, if you want to deploy the same application to a different environment, you’ll have to go in and edit that YAML by hand, which is definitely going to end up in some kind of PEBKAC situation.
Ugh. Is there a better way?
Yes. You can use some tools to help you generate that YAML, saving your precious wrists. So let’s look at some tools that can generate Kubernetes manifests.
Save that typing. Use a generator 🔨
Once you’ve got comfortable with kubectl apply -f, you’ll probably want to start generating that YAML dynamically, or even avoid writing it altogether.
This is where some of the helper utilities come in handy, like Kustomize and jsonnet.
Merge and patch YAML with Kustomize
Kustomize is a utility for templating your Kubernetes YAML files. Kustomize lets you patch and merge YAML files together, before you apply them to the cluster.
Kustomize is already included in kubectl. You just use kubectl apply -k to use it.
For example… if you want to deploy the same app into different environments with different configuration, you could define your common configuration in a base YAML file, and then use Kustomize to merge it with different overlays for development and production.
Here’s an example of that:
Click on the tabs above to view the files in this example.

1. kustomization.yml - A sample Kustomize file
2. deployment.yml - A sample Deployment
3. production.yml - An overlay (patch) to merge into the Deployment
4. result.yml - The result
# This file tells Kustomize what to do
resources:
- deployment.yml
patchesStrategicMerge:
- production.yml# This is a regular Kubernetes Deployment
apiVersion: apps/v1
kind: Deployment
metadata:
name: pet-shop-app
spec:
replicas: 1
selector:
matchLabels:
deployment: pet-shop
template:
metadata:
labels:
deployment: pet-shop
spec:
containers:
- name: app
image: pets/petshop:latest# This fragment will be merged into the Deployment
# e.g. it defines a password for Production
apiVersion: apps/v1
kind: Deployment
metadata:
name: pet-shop-app
spec:
template:
spec:
containers:
- name: app
env:
- name: SECRET_PASSWORD
value: production# This is the result after running:
# kubectl apply -o yaml -k .
apiVersion: apps/v1
kind: Deployment
metadata:
annotations:
kubectl.kubernetes.io/last-applied-configuration: |
{"apiVersion":"apps/v1","kind":"Deployment","metadata":{"annotations":{},"name":"pet-shop-app","namespace":"toms-project"},"spec":{"replicas":1,"selector":{"matchLabels":{"deployment":"pet-shop"}},"template":{"metadata":{"labels":{"deployment":"pet-shop"}},"spec":{"containers":[{"env":[{"name":"SECRET_PASSWORD","value":"production"}],"image":"pets/petshop:latest","name":"app"}]}}}}
name: pet-shop-app
namespace: toms-project
spec:
replicas: 1
selector:
matchLabels:
deployment: pet-shop
template:
metadata:
labels:
deployment: pet-shop
spec:
containers:
- env:
- name: SECRET_PASSWORD
value: production
image: pets/petshop:latest
name: appGenerate your JSON with jsonnet
Jsonnet is a language for generating JSON documents.
Think of it like a way to create a JSON document dynamically. You can copy sections, filter, and much more.
You can use Jsonnet with something like Tanka or Kapitan.
Use a tool to deploy and manage apps in Kubernetes
Once you’ve moved on from using kubectl with your hand-written or generated YAML, you might be interested in tools that can create objects and manage them for you.
The main approach these days is to use Helm.
Helm, the “package manager”
Helm is a huge time-saving tool for installing applications on a Kubernetes cluster.
Helm is called a package manager for Kubernetes because you can use it to create a package (called a “helm chart”) which contains all the Kubernetes resources that your app needs. And Helm can also turn these packages into objects in your Kubernetes cluster.
It effectively wraps up your Kubernetes objects into a single unit – in fact, it can create a gzipped (.tgz) file, which you can publish to the web.
What’s in a Helm chart?
A Helm chart contains:
-
A chart description file
-
YAML templates for the Kubernetes objects for your app, like a Deployment, Service, Ingress and so on.
-
A values file which sets some default variables in the chart.
A Helm chart doesn’t include any Docker images. It holds the Kubernetes objects that are needed to deploy an app, but not the image itself.
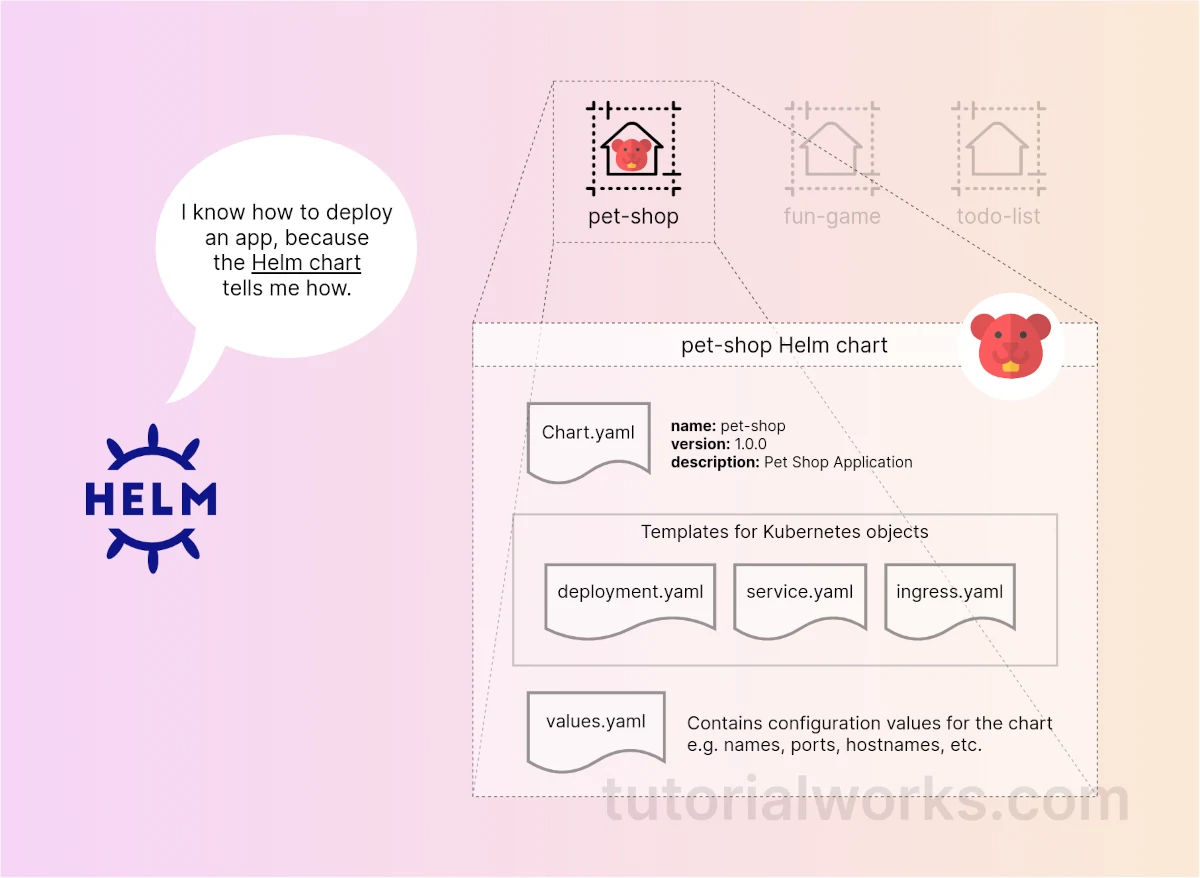
A chart tells Helm how to deploy an application onto Kubernetes
Key components of a Helm chart
by
Tutorial Works
is licensed under
CC BY-SA 4.0![]()
![]()
![]()
Helm creates and manages objects in Kubernetes
With Helm, it’s pretty easy to consume third-party software, like databases or monitoring tools. There’s a public repository of Helm charts at ArtifactHub.io.
The process goes something like this: Once you’ve found a Helm chart for the software you want to use, use Helm to install it into your cluster, and then it’s ready to use.
Helm turns the chart into a set of objects on the cluster, which is called a release. Helm also adds labels to these objects. This helps it to track all of the Helm releases that are in the cluster.
Helm knows what’s running in the cluster
With its clever use of labels and Secrets, Helm can see all of the Helm-managed applications that are running in the cluster.
Helm can then upgrade or downgrade these applications, just like a package manager on Linux.
The downside (yes, there’s always one)
There is one big downside to Helm, especially if you are deploying someone else’s Helm chart from the web.
The main downside is this:
Everyone’s Kubernetes cluster is different. Your needs are different. You might need to make a change to the way the chart is deployed – like changing a small piece of configuration.
But, like a remote control, you’ve only got a limited set of controls which are exposed to you (the values that are exposed in the values.yaml file). If you want to make any deeper changes to the Helm chart, you’ll need to fork it and change it yourself. (This is a bit like taking a remote control apart, and adding a new button!)
Package management is fine for installing and upgrading software. But if you really want to deploy software reliably in your cluster, you need GitOps.
GitOps: Use Git as the source of truth for your cluster
The next level of deployment management in Kubernetes is to look at the problem from the opposite angle.
Instead of using a tool to generate and push some objects into the cluster, why not store those objects in Git, and automatically pull them into the cluster?
After all, Git is a reliable way to manage and track code, and your Kubernetes YAMLs are all code.
That’s what GitOps is all about.
ArgoCD
ArgoCD is probably the most well-known of the GitOps tools. You install ArgoCD into your Kubernetes cluster, and configure it to watch some Git repositories.
Whenever any of the files in those repositories changes, it applies the new files to the cluster automatically.
The upside of this is that if you accidentally delete objects in the cluster, Argo will notice and automatically fix them for you.
Summing up
These are just some of the ways that you can deploy applications onto Kubernetes. From simple and manual, to highly complex and automated.
-
Writing your manifests
-
Using tools to create manifests
-
Using a package manager like Helm
-
Syncing your cluster config with a Git repo
How do you deploy to Kubernetes? Anything we’ve missed in this article? Let us know.