Developing with Kubernetes on Fedora
Here’s my opinionated guide to getting set up with developing for Kubernetes on Fedora.
We’ll cover the important things: how to run a Kubernetes cluster locally on Fedora, how to interact with it, and how to run a quick smoke test.
Setting up your Kubernetes cluster: so many choices…
When you want to set up a local Kubernetes cluster for development, you’ve got, well, a few options:
-
kind aka “Kubernetes-in-Docker”: You can use this to create a local test cluster.
-
k3s: - this is a micro-distribution of Kubernetes from Rancher. It’s intended mainly for edge and IoT devices, but it’s also pretty good to run as a tiny, low-overhead developer cluster.
-
minikube: this is an instance of Kubernetes running inside a virtual machine, container, or on “bare metal” (i.e. directly on your laptop). This is the option we’ll be using.
Paralysed by choice? Don’t be. They all do pretty much the same thing, which is to create a small Kubernetes cluster.
I’m going to be opinionated in this article, and choose minikube.
Use minikube to launch a local Kubernetes cluster in a virtual machine
When you’re learning Kubernetes, or putting your knowledge from a Kubernetes course into practice, it’s often easier to start with minikube, instead of the complexity of creating a full-blown Kubernetes cluster.
Minikube, is a small local Kubernetes cluster that runs on your laptop. From the official documentation:
minikube quickly sets up a local Kubernetes cluster on macOS, Linux, and Windows. We proudly focus on helping application developers and new Kubernetes users.
A great thing about minikube is that it already includes the kubectl command that you use to interact with a Kubernetes cluster.
So when you use minikube, you basically get everything you need to run and interact with Kubernetes, in a box.
Installing minikube
You can grab the minikube binaries from the project website, but I prefer to install it from a package.
Fedora uses the RPM package manager to install and update software in packages (rpm files). And the Minikube project provides an RPM package for Fedora, which means that you can install it using the rpm command.
minikube isn’t in any of the official Fedora repositories, and it’s not provided in another public repository either. So we need to download the package file manually.
We can use curl to download the latest package (the -LO option will follow any HTTP redirects, and save the package locally, using the same filename as in the URL):
curl -LO https://storage.googleapis.com/minikube/releases/latest/minikube-latest.x86_64.rpm
How to check what's inside the package first
If you want to check the contents of the package before installing it, ou can see exactly which files are inside an .rpm file, by using the rpm -ql command.
For example, the command tells us that this package will install /usr/bin/minikube:
$ rpm -ql minikube-1.16.0-0.x86_64
/usr/bin/minikube
Next, we install the RPM file that we just downloaded. We do this with rpm -ivh (where -i means install, and -vh means print some useful verbose output):
sudo rpm -ivh minikube-latest.x86_64.rpm
When this completes, minikube will be available in your terminal.
Nothing is running yet. But we’re making progress though.
But before we can launch a cluster, we need to set up virtualization support in Fedora. This will allow minikube to start a VM to run the Kubernetes cluster.
Set up virtualization, so minikube can launch a cluster in a virtual machine
Minikube can create clusters in a few different ways – in a container, in a VM, or on bare-metal. This is all handled by Minikube’s different drivers.
Think about Minikube like your own personal Kubernetes cluster manager, which can fetch the binaries for Kubernetes and use your computer’s lower-level tools to boot up a cluster, depending on the driver you choose.
I use the kvm2 driver, which is well supported, and allows you to run Kubernetes inside a virtual machine.
Don’t attempt this if you’re running Fedora inside a VM, unless you’re sure that your VM host supports nested virtualization. Instead, you can use the podman driver.
What about the minikube Docker driver? Do I need it?
You don’t need to use the Docker driver. You might think you need Docker because you’re running Docker containers in Kubernetes, but you don’t need it. Everything you need to run Docker containers on Kubernetes will be contained inside the minikube VM.
Docker isn’t supported on Fedora since version 32 anyway, and it’s a bit of a faff to set it up (but if you want to, you can do so with these instructions).
First, install all the virtualization utilities for Fedora using sudo dnf install @virtualization. The @ means “install the group of packages named virtualization”. This group includes things like libvirt, qemu-kvm and virt-manager:
sudo dnf install @virtualization
Once all the packages are installed, we next want to start the libvirtd service. This is the system service that creates and manages virtual machines:
sudo systemctl start libvirtd
sudo systemctl enable libvirtd
If you’re running Fedora without a GUI, then you might also need to add your user to the libvirt group, to give you permission to start VMs:
sudo usermod --append --groups libvirt $(whoami)
Now we’re pretty much ready to start the cluster. Exciting.
Use minikube start to boot up the cluster
When you run minikube start, Minikube actually downloads a couple of virtual machine images (.iso files) – one which contains your boot layer and all of the tools, and another image which contains a pre-installed Kubernetes cluster.
If you’re running low on disk space, you’d better free up some space before you complete this part. Minikube is hungry. The virtual machine images take up hundreds of megabytes alone!
We use minikube start to kick things off.
Then, minikube starts up the virtual machine. Prepare for emojis incoming!
😄  minikube v1.16.0 on Fedora 33
✨  Using the kvm2 driver based on user configuration
💾  Downloading driver docker-machine-driver-kvm2:
    > docker-machine-driver-kvm2....: 65 B / 65 B [----------] 100.00% ? p/s 0s
    > docker-machine-driver-kvm2: 13.52 MiB / 13.52 MiB  100.00% 6.08 MiB p/s 3
💿  Downloading VM boot image ...
    > minikube-v1.16.0.iso.sha256: 65 B / 65 B [-------------] 100.00% ? p/s 0s
    > minikube-v1.16.0.iso: 212.62 MiB / 212.62 MiB [] 100.00% 6.34 MiB p/s 34s
👍  Starting control plane node minikube in cluster minikube
💾  Downloading Kubernetes v1.20.0 preload ...
    > preloaded-images-k8s-v8-v1....: 491.00 MiB / 491.00 MiB  100.00% 6.70 MiB
🔥  Creating kvm2 VM (CPUs=2, Memory=3900MB, Disk=20000MB) ...
🐳  Preparing Kubernetes v1.20.0 on Docker 20.10.0 ...
    ▪ Generating certificates and keys ...
    ▪ Booting up control plane ...
    ▪ Configuring RBAC rules ...
🔎  Verifying Kubernetes components...
🌟  Enabled addons: storage-provisioner, default-storageclass
🏄  Done! kubectl is now configured to use "minikube" cluster and "default" namespace by default
Once minikube has finished booting up the cluster, it logs you on.
Use kubectl to make your first interaction with the cluster
Once the cluster is up, you can start interacting with it and doing stuff.
To interact with Kubernetes from the terminal, you need the kubectl utility (often pronounced “kube-control”).
kubectl is already included in minikube.
You can get to it by running minikube kubectl -- <commands>, e.g.:
minikube kubectl -- get pods
You might want to set a bash alias for this, so you can save on typing:
alias kubectl="minikube kubectl --"
We can check that the cluster is up and running by using kubectl to list all of the nodes in the cluster. There should only be 1 node, because that is how minikube sets things up:
$ kubectl get nodes
NAME       STATUS   ROLES                  AGE   VERSION
minikube   Ready    control-plane,master   75s   v1.20.0
That’s the first part finished – Kubernetes is ready for service! 💁
Next, we’ll see how to monitor the cluster from your web browser, and run a quick test.
Get a quick birds-eye view in the Kubernetes Dashboard
If this is your first time using Kubernetes, you might like to try Dashboard, which gives you a web-based view onto your cluster.
Dashboard is an official app from the Kubernetes project. Other dashboards are out there, but support for Dashboard is built in to minikube.
Type minikube dashboard, then you should see the Dashboard pop up in your web browser, like this:
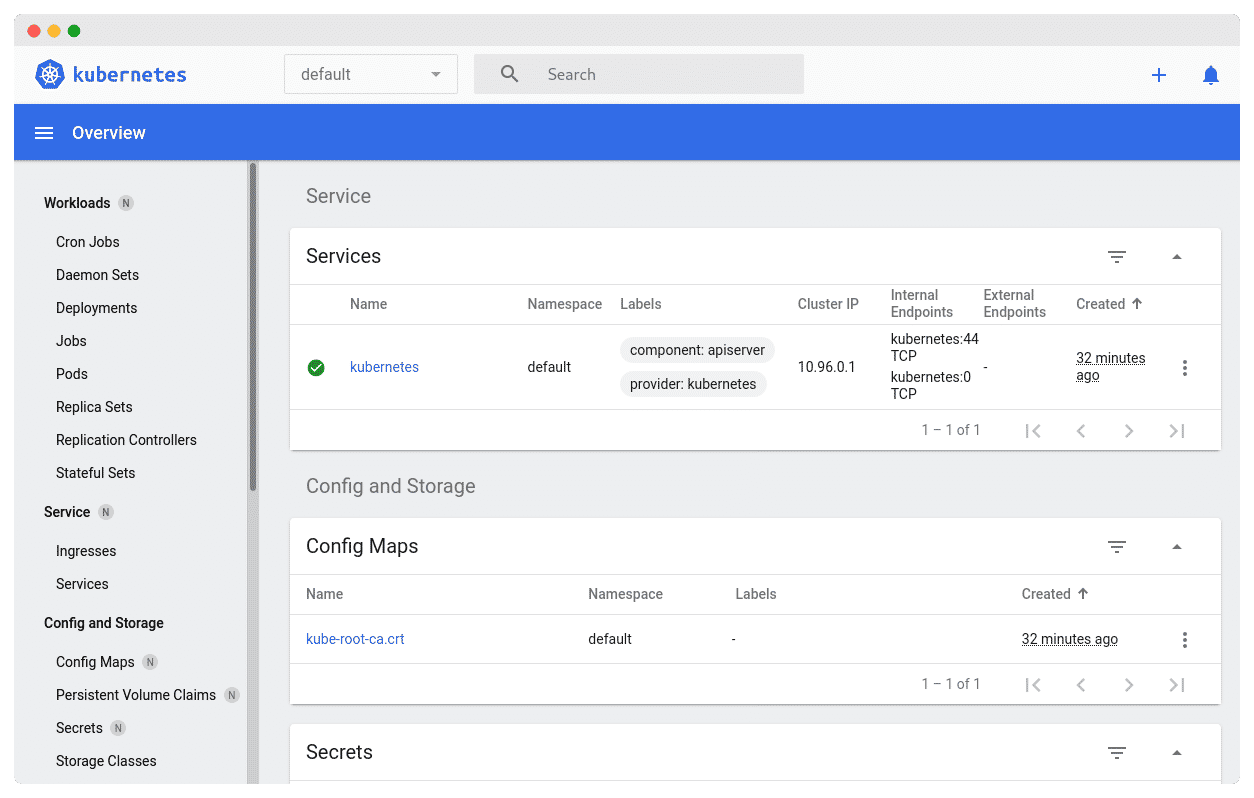
The Kubernetes Dashboard project gives you a nice visual UI onto your cluster
You can click around the objects in the left menu to see what’s currently configured in your cluster.
By launching Dashboard, we’ve validated that our cluster is configured correctly. This is because Dashboard itself runs in a Pod!
In the next section, we’ll look at another way of running a test Pod and fire up a quick example.
Run a quick example: create a Pod which prints a message
Before we start developing with this cluster, and to give you a bit of experience creating a Pod, we’re going to run a quick example.
Remember a Pod is the unit of deployment in Kubernetes. It is the thing that runs a container.
We’re going to create a Pod running the busybox image (busybox is an image on Docker Hub which provides some common GNU/Linux utilities) and tell it to print a warm greeting message.
The quickest way to create a Pod is to use kubectl run. It handles all the hassle of creating the manifest (JSON/YAML) for you, and applying it to the Kubernetes cluster.
Use kubectl run to create a pod which runs the busybox image. The -- at the end of this line instructs the container to run a command, which in our case is to use echo to print a string. We also add --rm to tell Kubernetes to delete attached pod resources when finished, and add -i to run it in the foreground so we can see the logs.
kubectl run -i \
    --restart=Never --rm \
    --image=busybox \
    testpod -- sh -c 'echo "Hello Tom!"'
Kubernetes pulls the image from Docker Hub, starts up the Pod, runs the echo command and then terminates. Then, the Pod is deleted.
Hello Tom!
pod "testpod" deleted
If everything is working, you should find that this happens quickly!
Alternative: creating a test Pod with YAML
If you prefer to create the same example Pod using YAML syntax (instead of kubectl run), then you can use this below:
kubectl apply -f - <<EOF
apiVersion: v1
kind: Pod
metadata:
  creationTimestamp: null
  labels:
    run: testpod
  name: testpod
spec:
  containers:
  - args:
    - sh
    - -c
    - echo "Hello Tom!"
    image: busybox
    name: testpod
    resources: {}
  dnsPolicy: ClusterFirst
  restartPolicy: Never
EOF
This won’t show you the output in your console. So, you can get the Pod logs using:
kubectl logs testpod
Which will show the message “Hello Tom!”
Now you’re good to go with your Kubernetes cluster! When you want to shut it down, check the next section to find out how.
Finished for the day? You can shut down the cluster
When you’re finished working with your Kubernetes cluster, you can shut it down, to clean up the resources.
(This is less important than if you’re running a cluster in the public cloud, and you forget to shut that down… and incur charges… which I do, all the time. ⚰️)
If you’re not sure whether you’ve got a cluster running, you can find out using minikube status.
This shows that I have one instance called minikube which is Running:
minikube
type: Control Plane
host: Running
kubelet: Running
apiserver: Running
kubeconfig: Configured
timeToStop: Nonexistent
Then, to shut down the cluster use minikube stop:
✋  Stopping node "minikube"  ...
🛑  1 nodes stopped.
Check that everything has stopped with minikube status again:
minikube
type: Control Plane
host: Stopped
kubelet: Stopped
apiserver: Stopped
kubeconfig: Stopped
timeToStop: Nonexistent
Cleaning up your minikube config
If you want to clean up minikube entirely, you can use minikube delete which will delete your VMs and settings (but it won’t uninstall minikube itself).
Adding --all clears out all your profiles (VMs), and --purge deletes all your personal settings in the ~/.minikube directory.
minikube delete --all --purge
Next steps
I hope you’ve enjoyed this tutorial on setting up a basic Kubernetes development environment in Fedora.
If you found it useful, please do share on social media or with your coworkers!
We’ve set up:
-
kubectl, the command line tool for interacting with Kubernetes
-
minikube, a Kubernetes cluster manager, for small development and testing clusters
-
A single-node Kubernetes cluster, running in a VM.
-
The Kubernetes Dashboard and a simple Pod, to test out the cluster
Next, you could check out our list of places to learn Kubernetes online.
Happy Kube-ing!