Run a web server in a Linux VM with Vagrant [Learning Project]
A gentle introduction to virtual machines and Linux. Learn how to create a Linux virtual machine and install a web server inside it, all using automation.
Linux can seem weird for beginners, especially if you’ve been used to Windows for most of your life. But if you’re thinking of getting into DevOps then you’ll need to work on your Linux skills. So how do you get some practice? In this practical project, we’ll run Linux on your computer and set up a website.
You should be able to complete this tutorial in under a couple of hours. It’ll give you a chance to build something real, and learn a few cool tricks along the way.
Let’s go.
About this tutorial
This tutorial is designed to get your hands dirty with virtual machines and Linux!
This is for you if:
-
You’ve never used Linux (or you just want some hands-on practice to use your skills)
-
You want to try out creating a virtual machine
-
You want some hands-on experience with infrastructure, as a springboard for further learning
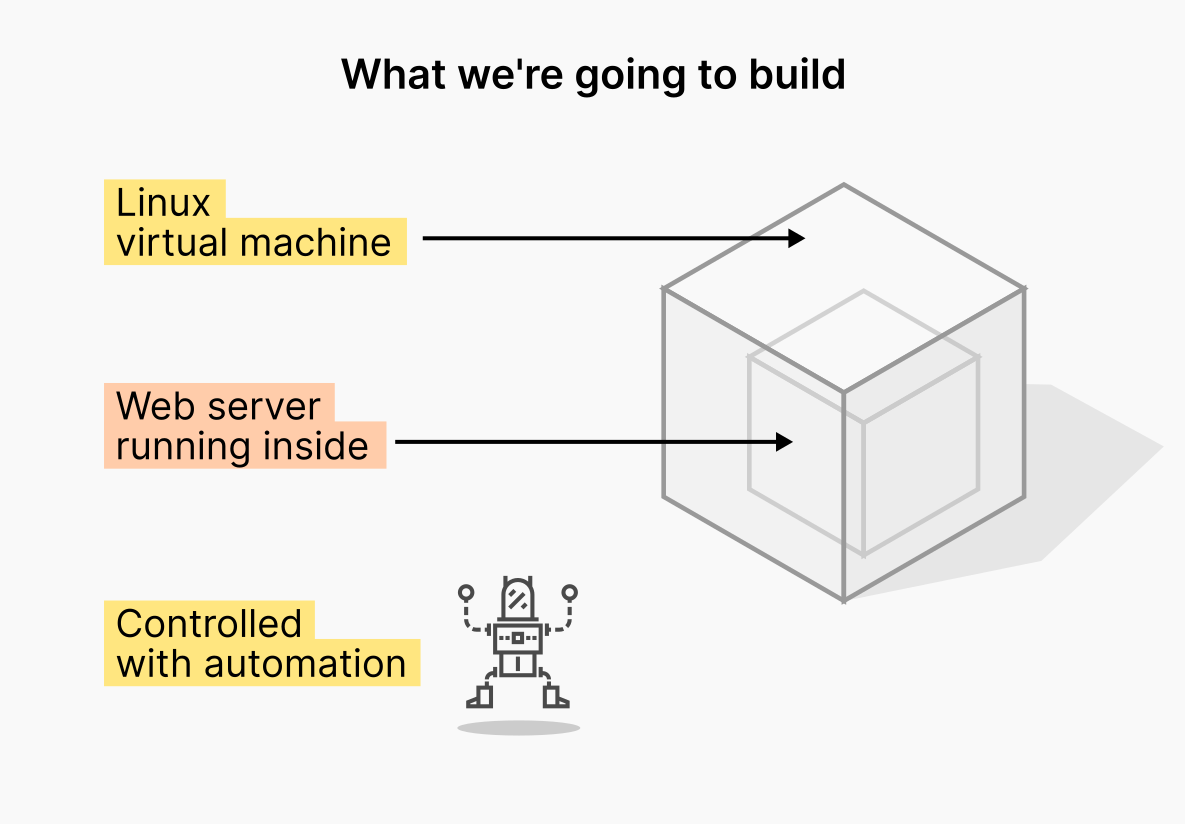
We’re going to create a Linux virtual machine and configure a web server inside it.
Then, we’re going to wrap all of this in some automation, so that we can perform the same action repeatedly.
Learning outcomes
By the end of this tutorial, you will know how to do all of these amazing tasks…
-
Create and use a virtual machine
-
Get familiar with the Linux command line, specifically Ubuntu - we’ll use commands like
ls,cp,sudo,aptand programs likenano. -
How to find and install programs in Ubuntu
-
Use a text editor (!)
-
Understand the basics of web servers and networking
-
Use automation to perform a task predictably and repeatably!
…And do all of this without pointing and clicking!
You’ll explore, learn and generally kick the tyres in a safe environment.
Don’t forget to give this tutorial a share with your network!
Check out this tutorial to create a Linux virtual machine and deploy a website with Vagrant, Apache and Ubuntu.
And now let’s introduce the tools (the supporting cast in this episode).
The tools (the stack)
In this tutorial we’re going to use Vagrant and VirtualBox, which are two programs that help you work with virtual machines.
Vagrant and VirtualBox have been around for a few years, and they aren’t trendy or particularly ‘hip’.
But, they give us a safe sandpit on the computer for learning and playing. (And the whole point is to enjoy learning, right?!)
We’re also going to use some other tools.
Here’s a run-down of the tools in the stack and why we’re using them:
| Category of tools | What we’re using | Why |
|---|---|---|
| Virtualisation tool | VirtualBox | Easy to use |
| Automation tool | Vagrant | Lightweight |
| Operating system | Linux (Ubuntu) | Very popular Linux distribution |
| Web server | Apache HTTP Server | Number 1 web server |
🧊 VirtualBox – a virtual machine manager
This is a tool for running virtual machines on the computer. This allows us to run Linux, even if our main operating system is Windows, or something else.
🇻 Vagrant – automation for virtual machines
Vagrant is a tool for building and managing virtual machine environments.
It’s essentially a tool that can control VirtualBox (and other tools like it) using commands and scripts.
This means it’s an ideal tool for doing a little bit of beginner automation.
🐧 Ubuntu – a distribution of Linux
Ubuntu is a distribution, or “flavour” of Linux. This will be used to run our server, and it includes the Linux kernel, and comes with a bunch of other programs and tools.
Ubuntu is one of the most popular distributions of Linux, so we’re using it here.
🌏 Apache HTTP Server – a web server
It’s not an attack helicopter, Apache is one of the most popular programs used to host a website on the internet. It reads web pages and images from disk, and serves them to users.
Get ready
Before we begin, check you’ve got everything you need:
What you’ll need
You need a computer with 8GB RAM and approximately ~10GB free disk space, because we’re going to be running Linux in a virtual machine.
You can use Windows, Mac or Linux. The software we’ll be using, VirtualBox and Vagrant, is available for all these platforms.
You don’t need an AWS account, as we’re going to do everything entirely locally (not in the cloud).
Install the required software
Next, install all the software that we need for the tutorial.
-
Install VirtualBox. Follow the instructions on the VirtualBox website to download and install VirtualBox for your platform.
You might need to restart your computer after installing VirtualBox, even if you’re running Linux.
-
Install Vagrant. Follow the instructions on the Vagrant website to download and install Vagrant.
Now you should be good to go!
Let’s begin:
Create a virtual machine
In this section we’ll create a virtual machine, running Ubuntu Linux.
We’ll use Vagrant to do it.
Create and start an Ubuntu Linux VM with Vagrant
-
Before you start, make sure that VirtualBox and Vagrant are installed. (See the previous section for instructions.)
We’re going to use VirtualBox to create and manage a virtual machine, and Vagrant will help us do this from the terminal.
-
Then, open your terminal (e.g. a Mac Terminal or Windows Command Prompt). Create a new directory and
cdinto it:mkdir myproject cd myproject -
Now use the
vagrant initcommand to initialise a new vagrant machine.We give the name of the “box” we want to use (a Vagrant box is basically a virtual machine template, with some software pre-installed):
vagrant init ubuntu/jammy64This initialises a new Vagrant virtual machine, using Ubuntu version 22.04 (which has a codename of “Jammy Jellyfish”, hence the “jammy” bit).
-
Then, boot up the virtual machine with:
vagrant up
Vagrant will now download the Ubuntu 22.04 box, create and configure a virtual machine and boot it up.
It will take a few minutes.
Vagrant works a little bit magically. How does it know which virtual machine you want to boot up?
When you run vagrant, it looks for a config file in your current directory, called a ‘Vagrantfile’. This is a file that describes a virtual machine (and we’ll see more about it later).
If you’ve got lots of Vagrant virtual machines on your computer, and you want to access a specific one, enter the directory where the Vagrantfile is located, and then run vagrant up, or vagrant ssh, or any of Vagrant’s other commands.
Now Ubuntu should have booted up, let’s have a look inside the virtual machine.
Look inside the virtual machine

In this section we’ll take a look inside our brand new Linux virtual machine.
We’ll explore the VM by listing some directories and running a command.
This is also a good opportunity to do your own playing inside the VM, and maybe practice some Linux commands.
Explore the VM
-
Let’s go inside the VM with this command:
vagrant sshThis gives you an SSH terminal session inside the Ubuntu VM.
Whenever you want to exit the session, just type
logoutand press Enter, or press Ctrl+D. -
Let’s list some files:
ls /etcThis will list the files and directories in the
/etcdirectory. -
Now let’s look at another directory. (This one’s a bit special.)
Vagrant helpfully shares our project folder (the one that you created above), so that we can access it inside the virtual machine. It’s mounted at the path
/vagrant:ls /vagrantThis should show you one file, Vagrantfile. This file was created by Vagrant when we started our VM with
vagrant init. -
Finally, in our little tour of our VM, we can make Linux say hello by using the
echocommand:echo 'henlo'
Now we’ve created the VM and done a little bit of touring inside.
Next we’ll install a web server inside the VM.
Install the web server
To install the web server, we’re going to use a package manager.
A package manager is just a tool that installs applications and libraries onto your Linux system.
For installing most server-side software, libraries, tools and utilities, it’s best to use a package manager, if it’s available.
Install Apache
To install Apache we’re going to use Ubuntu’s package manager which is called apt.
Install Apache in the Ubuntu VM
-
Remaining inside the VM, let’s list all the packages that are installed:
apt list --installedWhich will give you something like this:
vagrant@ubuntu-jammy:~$ apt list --installed Listing... Done adduser/jammy,now 3.118ubuntu5 all [installed,automatic] apparmor/jammy,now 3.0.4-2ubuntu2 amd64 [installed,automatic] apport-symptoms/jammy,now 0.24 all [installed,automatic] apport/jammy,now 2.20.11-0ubuntu82 all [installed,automatic] apt-utils/jammy,now 2.4.5 amd64 [installed,automatic] ... -
Let’s install Apache HTTP Server. First search for it. In Ubuntu, we use the
apt searchcommand for this:apt search apacheWhich will give lots of results, but there should be one near the top called
apache2, and “Apache HTTP Server” or similar:Sorting... Done Full Text Search... Done apache2/focal-updates,focal-security 2.4.41-4ubuntu3.6 amd64 Apache HTTP Server ...This is the package that we need.
-
Before we install Apache, we should do a package update. This is good practice! It just ensures that we’ve got the latest updates for everything installed on our system:
apt updateOh no! An error will occur here. We’re trying to install or update packages without admin or root privileges:
E: Could not open lock file /var/lib/apt/lists/lock - open (13: Permission denied)
E: Unable to lock directory /var/lib/apt/lists/
So, prefix the command with
sudo. This temporarily makes us a root user (superuser), so that we can install software:sudo apt update -
Now let’s install Apache:
sudo apt install apache2You’ll be asked to confirm the install. Press
Y. -
A bunch of magic now happens… Ubuntu downloads the Apache HTTP Server files from repositories and installs them for you.
The package manager also calculates other packages it needs (the “dependencies”) and installs them too. Magic.
-
Once it’s finished installing, we can see which files were installed using the
dpkgcommand:dpkg -L apache2This shows all the files installed onto the system by the ‘apache2’ package.
Is Apache running now? 🤔
We’ve installed Apache, but how do we run it? Is it running already?
Since Apache is a web server, we want it to be running all the time, in the background. We don’t want to start and stop Apache manually.
So apt has created and started a service for Apache.
Services are programs which are started and managed automatically by the operating system, so you don’t need to run them yourself.
Services in Ubuntu are managed by a program called systemd. To learn more about it, type man 1 systemd to read the relevant manual entry.
Let’s check to see whether Apache is running, and make a test request.
Check if Apache is running and test
-
We can see the status of the Apache HTTP Server “service” using the
systemctlcommand:systemctl status apache2…which should show us this:
● apache2.service - The Apache HTTP Server
    Loaded: loaded (/lib/systemd/system/apache2.service; enabled; vendor>
    Active: active (running) since Tue 2022-05-03 17:52:49 UTC; 4min 14s>
    Docs: https://httpd.apache.org/docs/2.4/
Main PID: 2728 (apache2)
    Tasks: 55 (limit: 1119)
    Memory: 5.1M
        CPU: 72ms
    CGroup: /system.slice/apache2.service
            ├─2728 /usr/sbin/apache2 -k start
            ├─2730 /usr/sbin/apache2 -k start
            └─2731 /usr/sbin/apache2 -k start
This means that Apache is running!
You can press
qto exit this message. -
Now let’s make a test request using the
curlprogram. We’ll connect to localhost and port 80 (which is the default port for HTTP):curl -v localhost:80You should see a very big HTML response, with something like this at the top:
vagrant@ubuntu-jammy:~$ curl -v localhost:80
*   Trying 127.0.0.1:80...
* Connected to localhost (127.0.0.1) port 80 (#0)
> GET / HTTP/1.1
> Host: localhost
> User-Agent: curl/7.81.0
> Accept: */*
>
* Mark bundle as not supporting multiuse
< HTTP/1.1 200 OK
If
curldoesn’t seem to be installed on your system, you can install it withsudo apt install curl.
✅ HTTP 200 OK! So we get a response! Apache is running! ✅
We can access the web server from inside the VM.
But we want to access the website in a proper web browser. How do we access it from outside the VM (from our desktop)?
We’ll need to understand a little about networking, which we’ll do next.
Set up networking
In this section we’ll set up networking, so that our website is available outside the virtual machine.
We’ll use some nice features of Vagrant to do this.
We’ll also look briefly at networking basics:
Networking for our VM
How do we access the website?
A web server serves content to users, over the internet.
To do this, it listens on a specific port on the server. Usually, web servers listen on port 80.
To access our web server from outside the VM, we’ll need to give the VM an IP address that we can reach from outside the VM.
How to see your VM’s network configuration
Inside the SSH session, type:
ip addr
You should see something like this:
1: lo: <LOOPBACK,UP,LOWER_UP> mtu 65536 qdisc noqueue state UNKNOWN group default qlen 1000
    link/loopback 00:00:00:00:00:00 brd 00:00:00:00:00:00
    inet 127.0.0.1/8 scope host lo
       valid_lft forever preferred_lft forever
    inet6 ::1/128 scope host
       valid_lft forever preferred_lft forever
2: enp0s3: <BROADCAST,MULTICAST,UP,LOWER_UP> mtu 1500 qdisc fq_codel state UP group default qlen 1000
    link/ether 02:7e:dd:2e:8a:02 brd ff:ff:ff:ff:ff:ff
    inet 10.0.2.15/24 brd 10.0.2.255 scope global dynamic enp0s3
       valid_lft 84571sec preferred_lft 84571sec
    inet6 fe80::7e:ddff:fe2e:8a02/64 scope link
       valid_lft forever preferred_lft forever
It’s a lot of text. 😑
But the lines labelled with “inet” are actually the IP addresses. In this example, the machine currently has 2 x IP addresses:
-
127.0.0.1, which is an IP address that machines use to refer to themselves. You use this IP address when you want to access something on the machine, from the machine itself! Also called “localhost”. -
10.0.2.15(ignore the bit after the/for now). This is the machine’s IP address that it uses to identify itself to the network. We can use this to access it from our host computer.
Now you might think that you can access this IP address, 10.0.2.15, from your host computer.
Well, you can’t.
Here’s why:
I tried the IP address but it’s ‘NAT’ working…
By default, VirtualBox configures your virtual machine with a network configuration called Network Address Translation (NAT).
NAT is a way to connect computers to a network, so that a machine can “see outside” (to the network & the internet), but to other machines, it appears invisible and unreachable.
(This is like how your laptop connects to your internet router at home.)
So, we need to change the network configuration, so that the machine is reachable.
Using DHCP instead
There are a few different ways that we can “expose” the web server to the outside world.
We’re going to use a type of network configuration called DHCP, or Dynamic Host Configuration Protocol.
With DHCP, the virtual machine will be assigned a reachable IP address when it starts up.
(This is like how your internet router works! It gets assigned an IP address by your ISP when it switches on.)
Let’s do it.
Configuring the VM’s network connection
Set the virtual machine’s IP address with DHCP
-
Exit the virtual machine so you’re back at your terminal (or Windows command prompt).
-
Find the file
myproject/Vagrantfile, and add this line to set the network configuration to DHCP:config.vm.network "private_network", type: "dhcp"(It goes between the
Vagrant...andendblocks).You can either use something like Notepad or a text editor if you’re feeling perky.
-
Now run this command to reload the configuration and restart the VM:
vagrant reload -
When the machine restarts, SSH into it again:
vagrant ssh -
Now if you re-run the IP addr command:
ip addrA new network interface has appeared!
This is like another virtual network connection, and it contains our VM’s IP address:
3: enp0s8: <BROADCAST,MULTICAST,UP,LOWER_UP> mtu 1500 qdisc fq_codel state UP group default qlen 1000 link/ether 08:00:27:18:2e:d7 brd ff:ff:ff:ff:ff:ff inet 172.28.128.3/24 brd 192.168.33.255 scope global enp0s8 valid_lft forever preferred_lft forever inet6 fe80::a00:27ff:fe18:2ed7/64 scope link valid_lft forever preferred_lft forever -
Look for the IP address next to the new
inetline and copy it.It might (or might not) begin with
172.28.We’ll use this in the next step.
If you have problems with this “dhcp” setting, you can specify an IP address manually instead, like this: config.vm.network "private_network", ip: "192.168.33.10"
Now we’re ready to run a test.
Test the network setup
Now we can access the web server from our computer:
Access the website from a web browser
-
Open a browser and go to http://IP_ADDRESS (e.g. for my example it would be http://172.28.128.3):
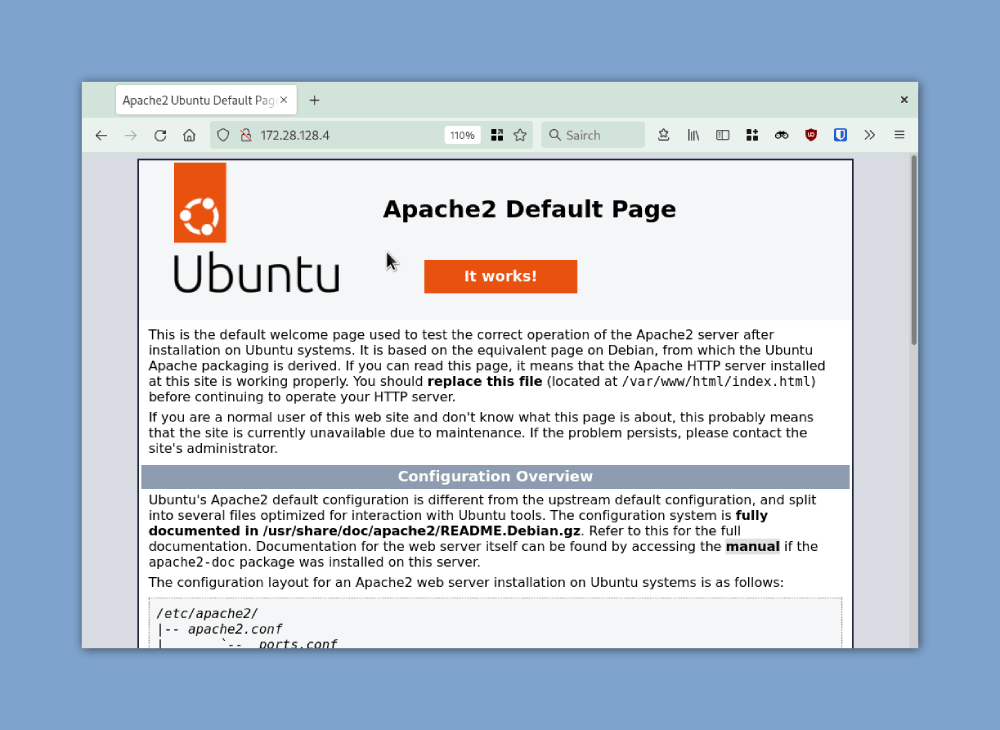
The Apache test home page on Ubuntu
Hurrah! We get the demo page.
You’re accessing a web server, running inside a Linux virtual machine, on your laptop.
(If you have a bottle of champagne available, open it now.) 🍾
Add some website content
Next we’ll add some content to the website.
Because the default demo page is boring.
But where is the website content located inside the VM?
Where is the default website content stored?
Well, the demo page tells us:
“You should replace this file (located at /var/www/html/index.html) before continuing to operate your HTTP server.”
…and, further down, it says:
“The default Ubuntu document root is /var/www/html”
So we’ll use that info to update the page.
You can also find this information by checking out the Ubuntu docs for Apache
Edit the default home page
Let’s make a quick edit to the home page, to prove that we’re editing the right file.
Use a text editor to edit the website home page
-
Let’s have a look in
/var/www/html:cd /var/www/html ls -al(The
-albit shows all of the files’ permissions and details, and sorts them alphabetically.) -
Notice that there’s a file inside,
index.html.Now edit this file using an editor.
nanois probably the easiest one to use, or if you’re feeling brave or knowledgeable you can usevi!See how the file is owned by
root root. This means we’ll need to prefix the command withsudoto be able to edit it.Now open the file with
nano:sudo nano index.htmlThis opens the Nano editor.
-
Now change a part of the HTML.
Add a few words somewhere, edit the header, swap one of the images… it’s up to you. Make a change where you’ll notice it – perhaps in the title tag or the main header.
You can use the usual Up/Down/Left/Right keys to move around the Nano editor.
-
Save the file.
In Nano, you press Ctrl+O then Enter to save, then Ctrl+X to exit.
-
Now reload the web page in your browser. Notice how the page has your edits!
I edited the background colour of the page, the image and the headings:
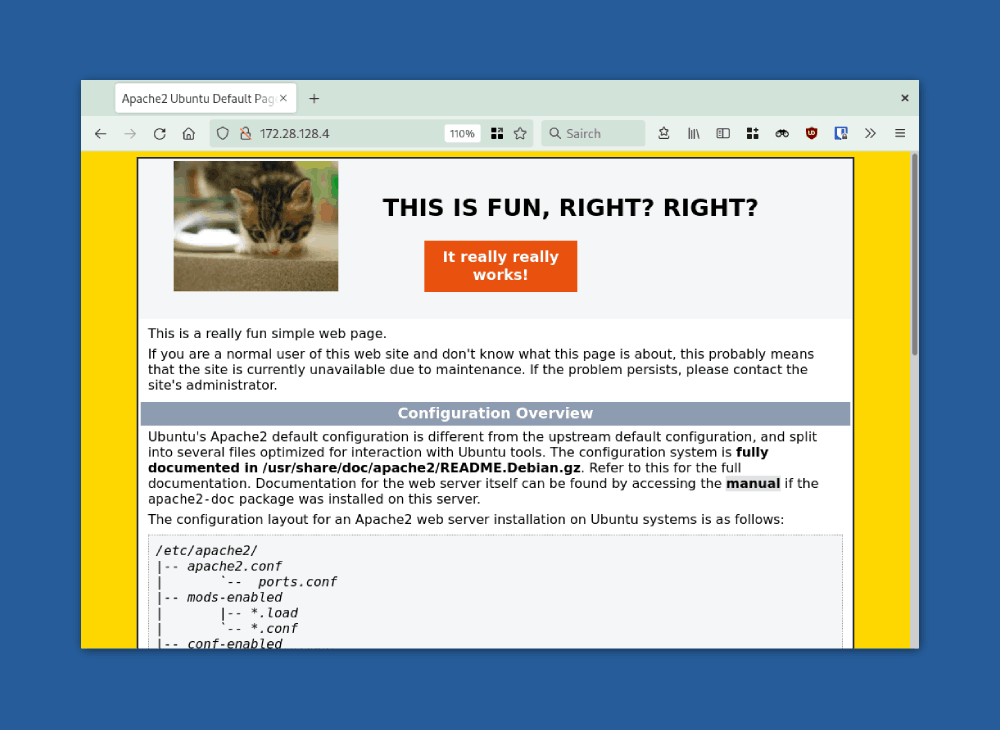
Our modified Apache test home page
You’ve edited the web page inside your virtual machine. Then, when you requested the page again, Apache HTTP Server served you the updated copy of the page.
Good stuff!
But we should replace this ‘default’ page with our own website.
Replace the default website
Now we want to replace the default web site content with our actual website.
We can copy some files into the virtual machine with Vagrant.
With Vagrant, whenever you start a virtual machine with vagrant up it automatically syncs the contents of the current directory into a directory called /vagrant on the virtual machine.
You can create your own demo website, or if you want to use one that I made for this tutorial, check out the demo repo at:
Download the code on GitHub
(The website code is in the webcontent folder.)
Let’s take a look.
Copy across the new website
-
Create a directory called
webcontentunderneath the location where you ranvagrant init.mkdir webcontent -
Inside the
webcontentdirectory, create a demo HTML page in Notepad or using another text editor.This is your chance to get creative and create a simple web page! Create an HTML file and maybe add an image or two.
OR, you can use our demo website (which consists of HTML, an image and a JSON file). You can find the files here:
https://github.com/tutorialworks/linux-website-vagrant/tree/main/webcontent
-
Inside the virtual machine, go to the
/vagrantdirectory and typelsto list all the files:cd /vagrant lsYou’ll see that the
webcontentdirectory should now be there (remember, this is because Vagrant automatically shares the host directory with the guest VM).Vagrantfile webcontentNow we just need to copy those files to Apache’s website root directory.
-
Let’s copy the website files to
/var/www/html.Again, we’ll need to use
sudo, because the target directory is owned by root. So inside the VM, run this:sudo cp /vagrant/webcontent/* /var/www/html/This will copy the contents of
webcontentinto thehtmldirectory. -
Now reload your web browser again. The web server now shows our web site, instead of the default page!
If you’ve used the demo website from GitHub, you should see something like this:

The finished website, birds and all
Great!
But this is all a hassle. We would need to do this work manually, every time we create the virtual machine.
So how can we automate it?
Automate our work
We’ve explored inside the VM and we’ve made some changes to it.
We know the commands that we need to run, because we’ve tried them out manually.
Instead of relying on manual work, let’s automate everything. Whenever the virtual machine is created, we want to automatically install Apache HTTP Server and copy the website files.
This is done with a process called provisioning.
Add provisioning commands
Vagrant has its own built-in provisioner which will run scripts and automation for us.
It can run commands, copy files, and replace the manual work of setting up the VM.
If you’ve created your Vagrantfile with vagrant init then you might see an example provisioning section at the bottom.
In Vagrant, a block of provisioning commands begins with config.vm.provision.
Follow these steps below to add some provisioning steps, so that Apache HTTP Server is installed, and the website files are copied to the correct location.
Add some provisioning steps to the virtual machine
-
In the
Vagrantfile, add the provisioning code like this, just before theendcommand in the Vagrantfile:config.vm.provision "shell", inline: <<-END apt update apt install -y apache2 cp -r /vagrant/webcontent/* /var/www/html/ echo "Machine provisioned at $(date)! Welcome!" ENDNotice that these are basically the same commands we’ve run earlier in this tutorial. We’re just codifying our work!
-
Let’s check that the Vagrantfile is looking good.
vagrant validateThis should print something like
Vagrantfile validated successfully. -
Run
vagrant destroyto delete the existing virtual machine. 💣vagrant destroy -
Now finally bring up the machine with the automatic provisioning code:
vagrant upYou’ll get a lot of log output, and the final line should read something like…
default: Machine provisioned at Sun May 15 14:43:22 UTC 2022! Welcome!
You’ve done it! You have created a Linux virtual machine, with Vagrant, that automatically provisions a web server and a website.
Good job.
Finally, destroy and rebuild
One of the most important things in DevOps is automation. We want to make sure that everything is automated, so that if a machine breaks, or something goes down, we can re-run the automation, and create everything again.
So now: run vagrant destroy and vagrant up again.
You should see the exact same process take place. Apache HTTP Server gets installed, the website content gets copied over.
This is a really good practice to get into – delete and recreate your work, to make sure you’ve scripted everything right.
The big reveal
You’ve been working in the command line so far. But did you know that you’ve been automating an actual program? Yes, VirtualBox is still running in the background.
Try opening the VirtualBox program on your desktop. You will see that your virtual machine is running there.
And you’ve configured it all using the command line, without using any GUI.
Commit to Git
This final step is so obvious… but we need to commit our work somewhere so that we don’t lose it.
So create a repo in GitHub (or your favourite Git hosting provider), and commit and push your work:
-
git init .– this creates a new Git repository in the current directory -
Create a file called
.gitignorecontaining this line:.vagrant/This
.vagrantfolder contains configuration for the Vagrant VM running on our computer only. We don’t want to share it with other people, so we exclude it from Git using this.gitignorefile. -
git add .Type
git statusand check that the.vagrantdirectory is not being committed to Git. -
git commit -m "Initial commit" -
git push
Job done! Code written, committed and pushed.
Read on to find out some extra things to try with your project.
Tips & Tricks
-
At any time, if you want to stop the virtual machine, change to the directory where the Vagrantfile is located, and run
vagrant halt. Then restart it withvagrant upand SSH withvagrant ssh. -
Can’t remember whether you left the virtual machine running or not? Check the status of the virtual machine with
vagrant status -
Running out of disk space? Vagrant will store the Ubuntu VM image (called a “box”) so that it can be used again and again. It’s large, so if you want to delete it, you can delete it using
vagrant box remove ubuntu/jammy64.
Wrapping up & what’s next
To finish up, run vagrant destroy in your project folder. This will destroy the virtual machine and free up some disk space.
If you also want to remove the original Ubuntu image (“box”) from your computer, then type vagrant box remove ubuntu/jammy64. This will free up some more space, but when you bring up your machine again, Vagrant will need to download the box again.
What’s next?
We’ve learned some of the tasks involved in DevOps: Linux, automation, provisioning, and deploying apps (OK, well, in this case, a website!)
You can use this tutorial as a starting point for more learning.
Want some ideas for what to try next? Try these:
Try making some changes
You can change some ways that the system runs, like:
-
Change the default directory of the web server
-
Change the port number that the web server listens on
-
Expose the web server with “port forwarding” instead of DHCP
-
Install Python and deploy your own custom Python application
Try swapping the stack
You can start to have a play around by swapping out different elements of the stack:
-
Swap Apache HTTP Server for something else: Nginx is another popular web server. You could install Nginx inside your VM instead. Or you could try running a database.
-
Swap the Vagrant provisioner: We’ve used the “shell” provisioner, which lets us write some commands to run when the VM boots up. But you can use other provisioners like Ansible (if you want to try it out).
-
Swap out VirtualBox for something else: In Vagrant, VirtualBox is a provider. You wouldn’t normally use VirtualBox in production; it’s really designed for creating and running virtual machines locally. So try one of the other providers – like VMware, Hyper-V (for Windows) or even Docker.
-
Swap Ubuntu for a different Linux distribution: There are many other distributions of Linux. You could try others. Try searching for more Vagrant boxes here.
-
Swap Vagrant & VirtualBox for AWS: Once you’ve whipped out your credit card, you could try deploying an Ubuntu virtual machine on AWS, with an automation tool like AWS’s CloudFormation, or Ansible.
Over to you
Thanks for reading. Don’t forget to share this tutorial with your network if you found it useful!
Check out this tutorial to create a Linux virtual machine and deploy a website with Vagrant, Apache and Ubuntu.
Did the tutorial work for you? Got suggestions or tips you want to share with the community?
Let us know in the comments below!