Create a Docker Build Pipeline with Jenkins on OpenShift
There are a thousand ways to implement a CI/CD pipeline. In fact, it’s probably more like a million, since there are so many options out there. But I’m guessing you’re probably familiar with Docker and Jenkins. In this tutorial, we’ll see how to leverage this dynamic duo to implement a CI/CD pipeline on OpenShift.
What we’ll cover
In this article we’ll set up a CI pipeline to test, compile and package a Spring Boot application into a Docker image, using Jenkins on OpenShift.
Once we’ve built the image, it will be pushed to an external registry. In my demo, I’m going to push to Docker Hub, but you could push to any other container registry, like Quay.io, Harbor or Amazon Elastic Container Registry.
Want a quick tour of what we’re building? Check out this video:
Get the code
I recommend you open the GitHub repo for this, so that you can see the actual files themselves:
Fork the repo and try it for yourself.
Introducing the cast & plot
The cast
There are four key players in this act:
-
OpenShift - The platform which runs it all. It’s going to run Jenkins and do the image building for us.
-
Jenkins - The continuous integration “thing-doer”. It sits on top of OpenShift, and will orchestrate the process, by running our pipeline, which is a sequence of steps.
-
Dockerfile - We’ll do a Docker build. This gives a lot of flexibility and portability. So our app will need to have a Dockerfile.
-
Spring Boot - Probably the most popular Java framework. So this is how the demo Java application has been implemented.
The plot
The plot is fairly predictable (predictability is a good thing in pipelines!). The pipeline is going to do this:
Start job in Jenkins → Fetch code → Run a Docker build → Push to Docker Hub
Now we’ve met the cast, and written the plot, let’s get down to work.
Setting up the pipeline
Write the Dockerfile
We’ll be doing a Docker build for this. Here’s the Dockerfile, which I’ve added to the root of the repository (./Dockerfile):
# Build the application first using Maven
FROM maven:3.8-openjdk-11 as build
WORKDIR /app
COPY . .
RUN mvn install

# Inject the JAR file into a new container to keep the file small
FROM openjdk:8-jre-alpine
WORKDIR /app
COPY --from=build /app/target/hello-java-*.jar /app/app.jar
EXPOSE 8080
ENTRYPOINT ["sh", "-c"]
CMD ["java -jar app.jar"]
It’s a multi-stage build. The first stage builds the app with mvn install.
Then, in the second part, the output from the first stage is injected into the new image. This helps keep the final image size small, omitting all of the build-time dependencies.
Create the Docker build in OpenShift
Next, we create a BuildConfig which tells OpenShift how it should build an image.
We’re doing a Binary build, which means that OpenShift will expect us (actually, it will be Jenkins, not us) to stream some files to the OpenShift cluster as part of the build.
The BuildConfig looks like, this, which you can add to the OpenShift cluster using the web console, or using oc create -f .....
Just make sure that you update the spec.output.to.name field to point to wherever you’d like the finished image to be pushed:
apiVersion: build.openshift.io/v1
kind: BuildConfig
metadata:
  labels:
    app.kubernetes.io/name: hello-java-spring-boot
  name: hello-java-spring-boot
spec:
  output:
    to:
      kind: DockerImage
      name: docker.io/monodot/hello-java-spring-boot:latest
  source:
    # Expect a local directory to be streamed to OpenShift as a build source
    type: Binary
    binary: {}
  strategy:
    type: Docker
    dockerStrategy:
      # Find the image build instructions in ./Dockerfile
      dockerfilePath: Dockerfile
Right now, we have everything we need to run the build manually, if we want to.
But, our goal is to create a pipeline. So we’ll need a pipeline, and an instance of Jenkins, somewhere.
So first, let’s write the pipeline.
Add the pipeline into the application repo
I’ve based this demo on the basic-spring-boot example pipeline, in the the redhat-cop/container-pipelines repo.
The pipeline uses a step in a Jenkins shared library. It uses the binaryBuild() step to kick off our binary build in OpenShift.
We define the pipeline in code (as a Jenkinsfile), and it looks like this. So this gets added to the repo:
// Based on:
// https://raw.githubusercontent.com/redhat-cop/container-pipelines/master/basic-spring-boot/Jenkinsfile

library identifier: "pipeline-library@v1.5",
retriever: modernSCM(
  [
    $class: "GitSCMSource",
    remote: "https://github.com/redhat-cop/pipeline-library.git"
  ]
)

// The name you want to give your Spring Boot application
// Each resource related to your app will be given this name
appName = "hello-java-spring-boot"

pipeline {
    // Use the 'maven' Jenkins agent image which is provided with OpenShift
    agent { label "maven" }
    stages {
        stage("Checkout") {
            steps {
                checkout scm
            }
        }
        stage("Docker Build") {
            steps {
                // This uploads your application's source code and performs a binary build in OpenShift
                // This is a step defined in the shared library (see the top for the URL)
                // (Or you could invoke this step using 'oc' commands!)
                binaryBuild(buildConfigName: appName, buildFromPath: ".")
            }
        }

        // You could extend the pipeline by tagging the image,
        // or deploying it to a production environment, etc......
    }
}
Deploy Jenkins on OpenShift
Now we need an instance of Jenkins which will run the pipeline.
The easiest way is to deploy an instance of Jenkins on OpenShift from a template. Just look for it in the OpenShift catalog, and follow the steps:
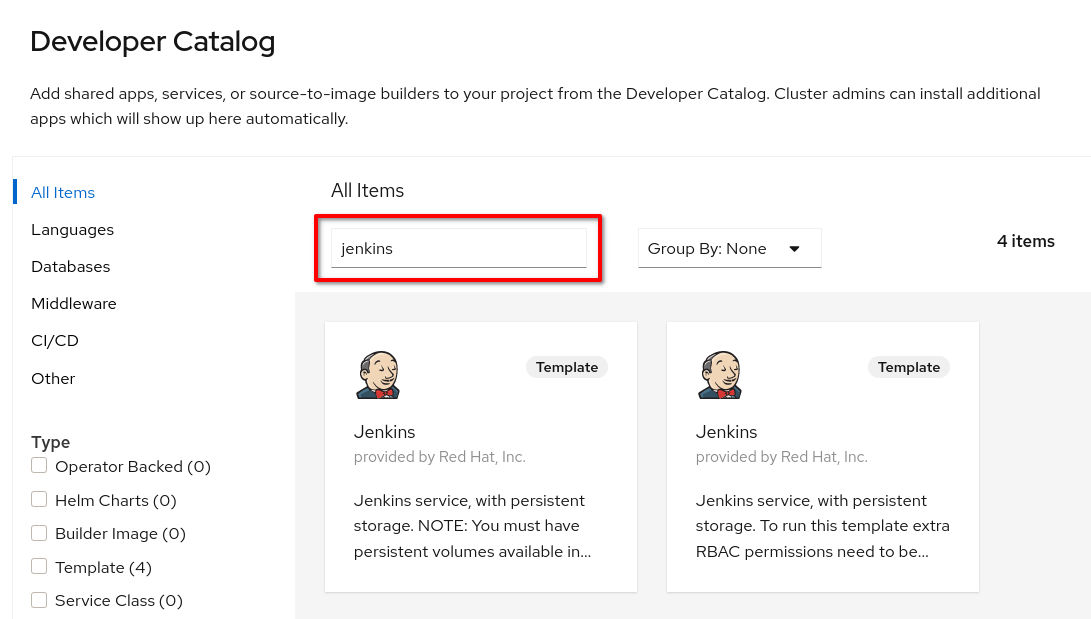
Deploying Jenkins from the OpenShift catalog
For this demo, you’ll need to use this OpenShift version of Jenkins, because it comes with a plugin pre-installed which lets you do things in OpenShift (such as starting a build) from inside your pipelines.
It will take a few minutes for Jenkins to start up, because it downloads a bunch of one-time plugins.
Can I use a shared Jenkins instance?
I recommend that you deploy your own instance of Jenkins, rather than using a shared Jenkins.
This is because multi-user Jenkins setups tend to be notoriously difficult to manage. Once everyone starts creating their own jobs, they start installing plugins that conflict with each other, and then you’ve got…. a right f**king mess.
With Jenkins up and running, we can now create the job.
Now let’s create the job in Jenkins
Create a new job in Jenkins, and make sure you choose a Pipeline job type.
Then we have to tell Jenkins where the pipeline source code is located. (It’s in the Git repo)
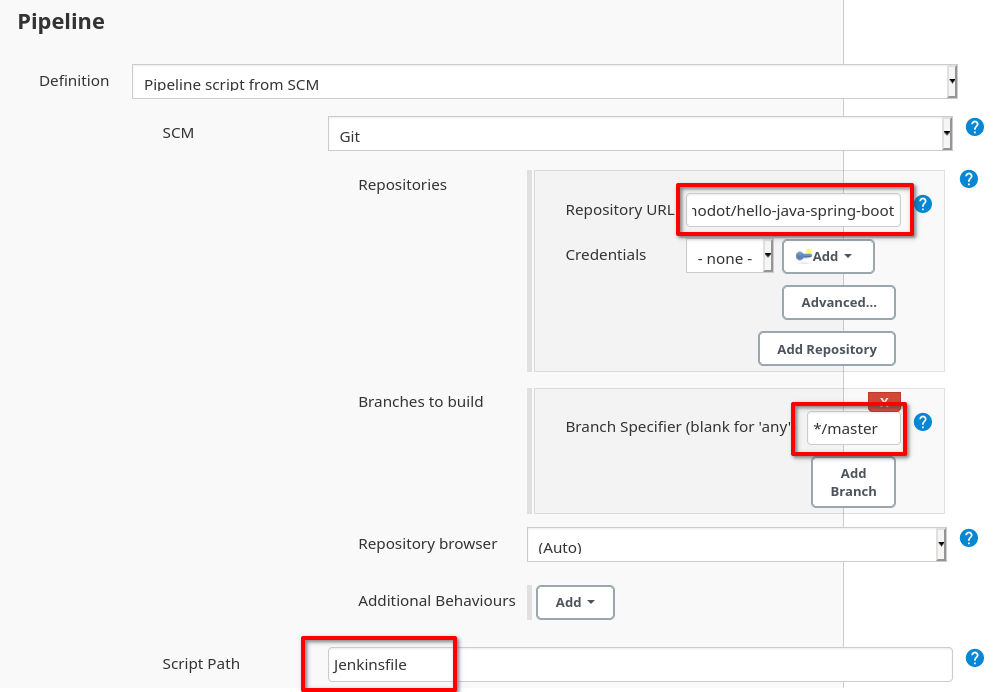
Configuring Jenkins to look for a pipeline in a Git repo
Set up Pipeline script from SCM and enter the details of your Git repo.
When the job starts, Jenkins will look for a pipeline script named Jenkinsfile in the Git repo.
Configure a secret to push the finished image
The final thing we need to do before we can run the pipeline, is make sure that OpenShift knows how to push the finished image to a registry.
Normally, if you were using the OpenShift internal registry, you would push to an ImageStream and you wouldn’t need to worry about authentication.
But in this demo, we’re pushing to an external registry (docker.io), so we need to set up a Secret with our registry details.
This should do the trick. Just replace the arguments with your own credentials:
oc create secret docker-registry my-secret \
    --docker-server=docker.io \
    --docker-username=YOURUSERNAME \
    --docker-password=xxx \

oc secrets link builder my-secret --for=mount
The for=mount bit means that the Secret will be mounted as a token inside Pods which are created by the builder service account.
Don’t forget about Docker Hub’s rate limits
The Dockerfile for this demo uses the official maven image on Docker Hub. If you’re using a shared cluster, you might be subject to Docker’s rate limits for unauthenticated users.
If so, you will need to create a secret with your Docker Hub credentials (if you didn’t already do that in the step above), and then attach the secret to the BuildConfig, like this:
oc create secret docker-registry docker-hub \
    --docker-server=docker.io \
    --docker-username=YOURUSERNAME \
    --docker-password=xxx \

oc set build-secret --pull bc/hello-java-spring-boot docker-hub
That’s all the setup done. We can run the job now.
Let’s go!
Now you can launch the job and see it running in Jenkins. If everything’s gone to plan, you’ll get nice green boxes:
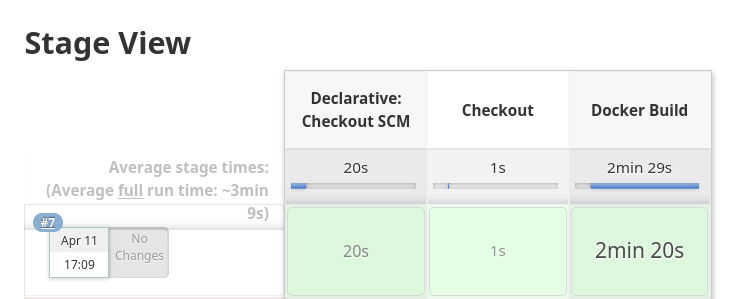
Viewing the job progressing in Jenkins
You can also open the OpenShift console, and you’ll be able to see the BuildConfig which is running the Docker build:

Watching the Build in OpenShift
At the end of the build, the finished Docker image will be pushed to the destination given in the BuildConfig.
So, we can finally check Docker Hub and see that the image has been pushed successfully, just a few moments ago:
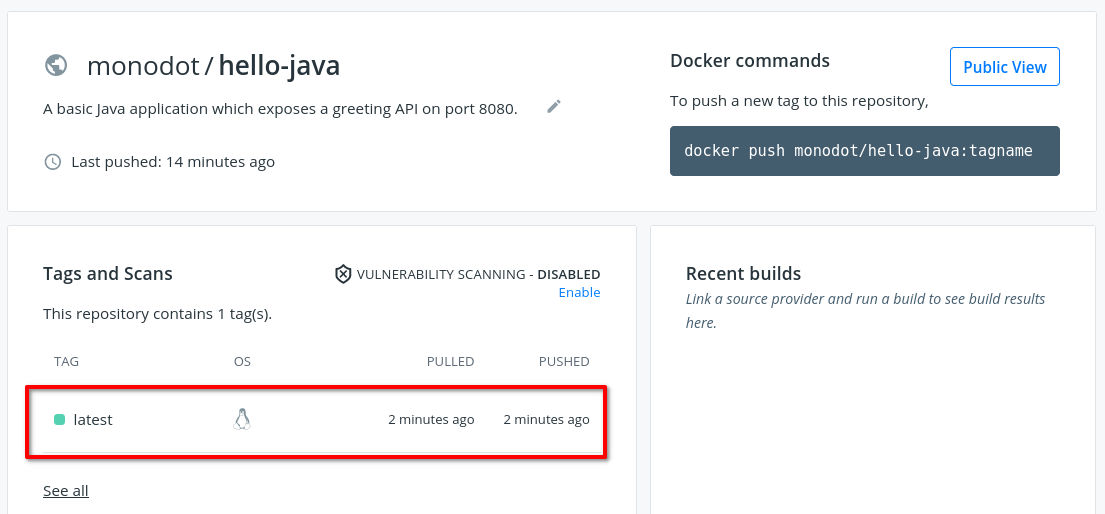
The image is pushed successfully to Docker Hub
Summing up
So, there you have it! An instance of Jenkins on OpenShift, running a CICD pipeline, which builds a Spring Boot application using a Dockerfile, and then pushes the finished image to an external registry.
For the next steps, you could add more stages to the CI/CD pipeline, like:
-
Running integration tests
-
Deploying the image onto OpenShift or Kubernetes
-
Producing reports
As always, the next step is up to you.
Useful resources
- redhat-cop/container-pipelines - the Red Hat CoP container-pipelines repo on GitHub, full of example pipelines that you can use.