Using volumes with rootless podman, explained
Podman is the new tool for running containers. It’s daemonless (unlike docker) and it’s designed to play a bit nicer in the Linux ecosystem, from the ground up.
Podman is architected like classic Linux tools – it’s lightweight, it doesn’t ask for more permissions than it needs, and it cooperates willingly with SELinux. (Unlike some of us!)
However, you might have realised that some commands which worked fine in Docker, simply don’t work in Podman; doubly so, when SELinux is in charge.
You’re tearing your hair out (if you have any).
You get all sorts of errors about permissions, and…. you desperately want to avoid disabling SELinux, but you just end up reaching for setenforce 0 and running everything with sudo.
Stop! 🚏 No, I mean stop. 🛑 We can fix this.
Just say no.
In this article I’ll go through how to share a volume from your host machine with podman, when you’re running rootless containers.
I’ll also share a podman command you can use which really helps you in these situations.
Rootless podman vs rootful at a glance
When you’re running containers with Podman, you’re probably going to run in either rootless or rootful modes. The way you choose to run Podman affects the user ID that your process will run as. Therefore, it affects the things that your containerised process is permitted to do.
The table below shows four possible rootless/rootful operating modes of Podman, and how they really work in practice:
| You run podman as.. | With containerised process running as.. | The actual UID visible on the host is… |
|---|---|---|
| root | root | 0 |
| root | non-root | The UID of the user running the process inside the container |
| non-root | root | Your UID |
| non-root | non-root | A non-root UID |
-
The first column is how you’re running podman. Do you run the command as the root user (e.g.
sudo podman run....), or not? -
The second column is the user that the container process is running as. You can set this explicitly with podman, using the
-uoption - e.g.podman run -u root... -
The third column shows who the process is really running as, on the host. That is, if you run
ps -efon the host, and find your containerised process, this is the UID that you will see in the process list.
As you can see, the ultimate user ID of the process can vary quite a lot! Let’s take a look at how that part works.
Understanding how rootless podman works
Rootless podman (running Podman as a non-root user) needs to do some gymnastics to get the same container experience you know from docker, but without requiring root.

Podman juggles UIDs
Source: monkik/Flaticon
When you run rootless podman, it uses a user namespace to map between the user IDs in the container and the user IDs on your host.
What are user namespaces?
User namespaces are a Linux feature that allow you to wrap and isolate a process, so that it appears to be running under its own, different set of security identities – such as user IDs and group IDs.
From the manpage:
A process’s user and group IDs can be different inside and outside a user namespace.
For example, a user namespace allows a containerised process to run as one user inside the user namespace, like UID 200. But then outside the user namespace (container), it’s actually running as a different UID completely (e.g. 100199).
Check out this excellent article by Dan Walsh on how user namespaces work with Podman.
In Podman’s user namespace, there is a new set of user IDs and group IDs, which are separate from the UIDs and GIDs on your host.
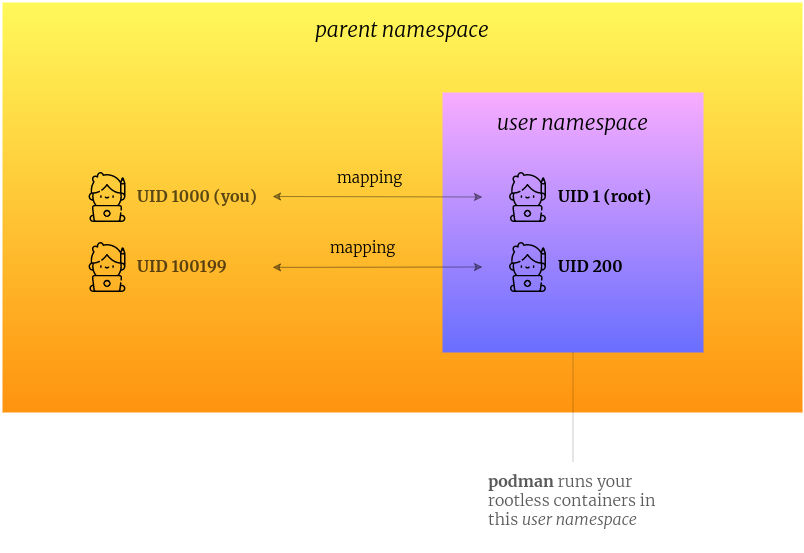
By using a user namespace, and using a map of UIDs, Podman can make a container process can appear to run as user 200 inside a container, but actually it’s running as a different user ID on the host.
You can see the actual mappings by viewing the file /proc/self/uid_map inside your container.
The Linux manpages have lots more detail on how this works. Check out man 7 user_namespaces
If you’ve got a few minutes, and you’re looking for a snappy video that explains this well, check out this video from Red Hat on rootless Podman:
Rootless containers share the same user namespace
All rootless containers run by you, are run inside the same user namespace. The engineers behind Podman explain this in this article on the ‘behind-the-scenes’ process of Podman:
All rootless containers must be run in the same user namespace. If they are not, some things (like sharing the network namespace from another container) would be impossible.
By using the same user namespace, your containers can share resources with each other, without needing to ask for root privileges.
It uses this user namespace to mount filesystems, or run a container which accesses more than one user ID (UID) or group ID (GID).
This mapping is fine for most situations, except when the container needs to be able to share something with the host, like a volume.
But - here’s the important thing:
When the container runs, any volumes which are shared with it, will appear inside the user namespace as owned by root/root.
When the container runs, any volumes which are shared with it, will appear inside the user namespace as owned by root/root. Because the mapping will map your UID on the host (e.g. 1000) as root (0) in the container.
Here’s an example of what I mean. I run rootless podman as a non-root user (user 200), and mount a volume from my host:
$ podman run --user 200 -it -v $(pwd)/myfolder:/mnt/myfolder:Z busybox
Now inside the container, look at the permissions on the mounted directory:
~ $ ls -al /mnt
total 16
drwxr-xr-t    3 root     root          4096 Jan  3 15:50 .
dr-xr-xr-x   14 root     root          4096 Jan  3 15:50 ..
drwxr-xr-x    2 root     root          4096 Jan  3 15:50 public
The directory is owned by root – not user “200”, or my user ID.
This means that if you’re running your container process as a non-root user, it won’t be able to write to that directory.
So how do we change the owner of the directory in the container, so the user can write to it?
And how can we troubleshoot and run commands in that same user namespace, when things go wrong – without having to start a container?
This is where podman unshare comes in.
podman unshare lets you run a command in the same user namespace as your containers
podman unshare runs a command in Podman’s modified user namespace. It’s intended to be run with rootless podman (where you run podman as a non-root user).
Since Podman uses user namespaces to make the magic of different user IDs and group IDs work, it would be helpful if we had a way of accessing this same user namespace, when we need to fix or investigate something.
This is where podman unshare comes in. From the manpage for podman-unshare:
podman unshare is useful for troubleshooting unprivileged operations and for manually clearing storage and other data related to images and containers.
It uses the unshare command, part of the Linux kernel. unshare is one of the commands that actually makes user namespaces possible, and therefore containers.
From the Linux manpage for unshare:
unshare - run program in new namespaces
The unshare command creates new namespaces … and then executes the specified program.
Why is it called "unshare"?
The reason it’s called unshare is nothing to do with unsharing of files, or making sure your parents don’t see your embarrassing photos on Facebook.
It’s because it runs the program in a namespace which is separate or “un-shared” from its parent process.
If you’re new to all this, unshare is not exactly a helpfully-named command, but that’s Linux history for you. ;)
When you use podman unshare, you’re effectively jumping out of your normal namespace, and into the Podman user namespace.
Out of (user) namespace
Source: Ukulele Go
It’s like executing the unshare command as the Podman process. So you can execute a command in the same user namespace, such as changing file permissions, or browsing your filesystem, if you need to.
You can check out Dan Walsh’s article on Opensource.com for more information on how rootless Podman works.
So now we know what podman unshare does, how is it relevant to sharing a directory?
How to allow a rootless podman container to write to a volume
So this brings us on to the task in hand. If you want to run rootless podman to run containers, but you want to share a directory from your host, how do you do this?
I do this on my laptop, because I run Nexus, the artifact repository, in a container. I want it to save its artifacts to a location on my host machine, so that if the container dies, I don’t have to download everything again.
Putting it all together, here are the steps:
-
Determine which user account is running the process within your container.
-
Enter Podman’s user namespace, and grant this user permissions to write to your directory.
-
Mount the volume when you run the container, add the proper SELinux label to allow the container user to write.
-
Check, and double-check ;-)
Get the UID of the container user first
First you need to know which UID the container is running as.
The user is specified in the Dockerfile of the image you’re running (in the USER line).
Or, when you’re running the container, you can set the user explicitly using the podman run --user <id> option.
Use podman unshare chown to grant the container user ID permissions to write to your directory
Next we need to change the UID/GID of the volume directory in the rootless Podman user namespace, to make it the same as the UID/GID of the container user.
In my case, the nexus container runs as UID 200. I can see how my rootless container would “see” the filesystem using podman unshare:
$ podman unshare ls -al /home/tom/myshares
drwx--x--x. 58 root root   4096 Dec 25 13:45 .
drwx--x--x.  8 root root   4096 Nov 18 16:00 ..
drwxrwxr-x.  6 root root   4096 May 18  2020 nexus2
As you can see, the nexus2 directory is owned by root.
This isn’t good, because when my container starts, it will want to write to that directory. And since the user running nexus in the container is user 200 and not root, it will fail.
So I use the chown command to set the UID/GID of the shared directory, and I run this command in my Podman user namespace:
podman unshare chown 200:200 -R /home/tom/myshares/nexus2
So far so good.
How can we check that things are working?
Check that the permissions are OK, by listing the directory inside the container
Now I want to make sure that when my Nexus container starts, it will be able to write to that folder.
So I run the rootless container. Using the -v option, I mount my volume as /sonatype-work in the container. And I override the entrypoint, so that I launch straight into a shell (/bin/sh):
podman run -it --rm --name nexus2 \
    -v /home/tom/myshares/nexus2:/sonatype-work:Z \
    sonatype/nexus /bin/sh
Note that I add the :Z flag to the volume. This tells Podman to label the volume content as “private unshared” with SELinux. This label allows the container to write to the volume, but doesn’t allow the volume to be shared with other containers. This syntax is also used in the docker command.
Once I’m inside the container, I can check that I now “own” the directory as the nexus user. If I own the directory, then I should be able to write to it:
$ ls -al / | grep sonatype-work
drwxr-xr-x.  15 nexus nexus 4096 Sep 27 13:29 sonatype-work
This ls command shows me that the sonatype-work directory now appears to be owned by nexus/nexus when inside the container. Result! ✅
When I next start the container, the nexus user will have permissions to write to this directory.
Or, you could just run your process as the root user inside the container
Another option is to run as the root user inside the container. (Yes, rather confusingly, you can run a rootless container, and set the container user to root, and the process will run as your unprivileged user on the host)
To run your process as the root user in the container, use -u root:
podman run -it --rm --name nexus2 \
    -v /home/tom/myshares/nexus2:/sonatype-work:Z \
    -u root \
    sonatype/nexus /bin/sh
Don’t forget to add the :Z suffix.
Now when I enter my sh shell, I will be root inside the container.
Running as root in the container is a bit more portable, but it’s cheating. We really shouldn’t be running anything as root, even inside a container. For this reason, this solution isn’t recommended for production setups.
TLDR
You’ve skipped this whole article and that makes me a little sad but I’m not surprised.
But, if you really want the super-condensed TLDR:
-
Rootless Podman uses user namespaces to run container processes
-
podman unshareallows you to run a command inside the Podman user namespace -
Change the owner of the directory inside this namespace, to ensure your container user can write to it.